
19 Terrific Tips for Audio Hijack 3
Posted By Paul Kafasis on June 22nd, 2016
We recently released Audio Hijack 3.3, and it includes several great new features. In addition to incorporating new functionality, a great deal of effort has gone into making Audio Hijack 3 easier to use than ever before, and we’ve been pleased to hear from many users who are thrilled with how approachable it is. Still, there are more than a few secrets and tips you might not know about, so give this post a quick read to learn something new about Audio Hijack.
Tip #1: Quickly Get a New Blank Session
To immediately get a new blank Session to work with, hold option as you click the “New Session” button. You can also press option-command-N on your keyboard. You’ll bypass the Template Chooser and get an blank Session to configure.
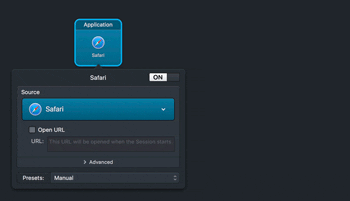
Tip #2: Schedule Your Recordings
From the Schedule tab of the Home window, you can configure a Session to automatically run at a specific time. Add the direct URL for a radio stream to the “Open URL” field of an Application Source block and you can even do timed recording of audio, much like a DVR.
Tip #3: Don’t Forget to Mute Those Timers!
If you schedule a recording for the middle of the night, you probably won’t want it to make noise while it’s recording. Remove the Output block from your audio chain, and audio will be recorded without being heard.

Delete the Output block to mute the timer.
As well, be sure to turn on the “Quit Sources” checkbox in the Schedule tab. That way, when the timer is finished (and Audio Hijack stops capturing audio), the audio-producing source application will be shut down.
Tip #4: A Musical Alarm Clock
The Schedule tab can be used for more than timed recordings. It can also help you use your computer as a musical alarm clock. Start by putting a radio stream in the “Open URL” field of an Application Source block, and hook it up to an Output Device block set to your speakers. Then, set a timer for when you want to wake up, right in the Schedule tab. At the appointed time, Audio Hijack will pop open and your audio will play.
Tip #5: Share Your Sessions
It’s possible to create complex and powerful Sessions in Audio Hijack to do just about anything you might need. It’s also possible to share those Sessions, by exporting them to distribute to others for use in their own copies of Audio Hijack. When you’re in the Session you wish to share, just select “Export…” from the Session menu, and save. You can then email your Session to a friend, or even post it on your website.

An exported Session in the Finder
Tip #6: Share Your Sessions Faster
If you want to quickly export one or many sessions, as explained in Tip #5 above, do it from the Home window. Click to the Sessions tab, then select one or more Sessions you want to export by clicking (and shift-clicking). Once you’ve got the desired Sessions selected, just drag them to your Desktop, and they’ll be exported instantly.
Tip #7: Tear Off Your Popovers
Nearly all blocks in Audio Hijack feature a popover which provides access to the block’s settings. When you click on a block, its popover appears. When you click away, that popover disappears. What if you want those controls to remain available? Just click the popover and drag it away from the block to tear it off. Now, the settings will stay open for easy access.
Tearing off a popover
Tip #8: Pin Popovers To Make Them Float
If you need to work in other applications while you record, but still want access to some of Audio Hijack’s controls, you can! First, tear off the popover for the relevant blocks (see Tip #7, above). Then, click the Pin button. When its pinned, the popover will float above all other windows on your system, and it’ll be accessible from within any application.

A pinned popover
See the “Popover Features” page of the Audio Hijack manual for more details on popovers.
Tip #9: Use Arrows on Effects Sliders
If you want to make a minute adjustment to a slider, you can do so with your keyboard. First, click the slider you wish to adjust, and you’ll see the slider’s knob highlight blue. Now, use the left/right or up/down keys on your keyboard, and the slider will move in its smallest interval. Need a bigger jump? Hold shift and hit left/right or up/down to move in larger jumps.
Tip #10: Use the Number Keys Too
You can also use the number keys on your keyboard to move an effects slider to an exact location. Click a slider’s knob to highlight it, then type a number and hit Return. The slider will be moved to the exact location you specify.
Tip #11: Block Presets!
Block presets let you save your settings for a particular block type, then use those settings again in other instances of the same block, in any Session. Block presets are a major feature of Audio Hijack, and one we hope many users take advantage of. However, they’re a bit hidden, so they’re worth noting here.
A simple example can be seen with the 10 Band Equalizer block. Create a custom EQ setting, then choose “Save as Preset…” from the Presets menu at the bottom of the popover. Give your preset a name, and you’re set. The preset will now appear in the “User Presets” section, in all 10 Band Equalizer blocks throughout Audio Hijack.

Equalizer Presets
The power of presets is extended to all blocks that feature popovers, from the Application Source block to the Recorder block and more. Save your detailed configurations once, then access them in any Session with just a few clicks. They’re a tremendous time-saver!

Recorder Presets
Tip #12: Turn Blocks Off
When you no longer need a block in your Session, you can highlight it, then choose Delete from the Edit menu to remove it. However, you may want a block in your Session to be active only some of the time. In that case, you can turn the block off temporarily. To do this, click the On/Off switch in the block’s popover. The switch will turn off, and you’ll see the block dim. You can also right-click a block and choose “Turn Off This Block” to toggle it off.

A disabled Equalizer block
While a block is off, audio will pass it without being affected, but it will be available for use instantly by simply turning it back on.
Tip #13: Monitor Without Recording
The old Audio Hijack Pro 2 had two distinct stages of audio capture: Hijacking and Recording. We simplified this in Audio Hijack 3, and now Sessions are either running or not. While this has proven much clearer overall, a few long-time Audio Hijack users have had difficulty determining how to monitor audio without recording it in Audio Hijack 3. Fear not!
If you just want to adjust audio with effects, just make a Session that doesn’t include any Recorder blocks (or delete any Recorder blocks currently in your Session). The Sweeten template provides an example of this. If you do plan to record audio, but wish to monitor audio first, just turn your Recorder block off as described in Tip #12. When the Recorder block is off, audio will flow through the session, but no recording will be made. When the audio sounds just right, turn the Recorder block back on to begin recording.

A disabled Recorder block
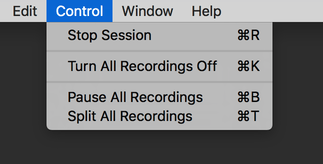
Tip #14: Control Your Recorder Blocks
Look inside the Control menu to see several ways you can control any and all Recorder blocks in a Session. The “Turn All Recordings Off/On” toggle is helpful for monitoring audio, as discussed in Tip #13. You can use “Pause All Recordings” to temporarily suspend recording, so no additional audio will be saved until you resume. Finally, if you select “Split All Recordings”, the Recorder blocks will stop recording to the current files, and begin recording to new files.
Audio Hijack’s Control menu
Tip #15: Record to Multiple Formats at Once
Thanks to the new audio grid, you can now record to multiple formats in sync. For instance, you can save audio to both compressed and lossless formats together, with just a single click. When you run your session, all Recorder blocks will activate at the same time.

Multiple recorders at once
Tip #16: Add Features with Audio Unit Effects
Audio Hijack comes with over a dozen of our own custom audio effects, but it also supports modern (64-bit Cocoa) Audio Unit plugins. We automatically load the Audio Units built-in to Mac OS X by Apple, but there’s a wealth of third-party Audio Units out there too.
 The Graphic EQ built in to Mac OS X
If you’re looking to add audio effects or meters, just place your new Audio Units in one of the standard locations on your system (/Library/Audio/Plug-Ins/Components or ~/Library/Audio/Plug-Ins/Components), and they’ll appear in Audio Hijack’s Library.
Tip #17: Generic UI for AU Effects
Speaking of third-party Audio Units, some of them sure have some…interesting interfaces, don’t they? If you’d rather these effects showed a simpler look, right-click on the block’s face and select “Use Generic Audio Unit Interface” from the pop-up menu. Now the effect’s controls will appear with a generic look, which may be easier to use.

A generic interface
Interestingly, this feature was originally added to make more audio effects accessible to users with vision impairments. We’ve since found that many users prefer the generic UIs to the custom ones.
Tip #18: Use the Time Shift Effect for Transcribing Audio
The Time Shift Effect was added in Audio Hijack 3, but we really refined it in Audio Hijack 3.2. It’s found a devoted following of folks transcribing audio to text, and we worked to make that even easier. Time Shift now features a powerful popover that enables you to jump forward or back in 3, 10, or 30 second increments. You can tear off and pin that popover (as described in Tips #7 and #8) for easy access from anywhere.

The Time Shift block
As well, Time Shift’s controls are now accessible via global keyboard shortcuts. Open up Audio Hijack’s preferences to set hotkeys for Time Shift’s controls. Now your hands won’t even have to leave the keyboard when transcribing audio to text.

Time Shift’s global shortcuts
Tip #19: Make Your Own Keyboard Shortcuts
Audio Hijack offers built-in keyboard shortcuts for some of the most frequent actions, like starting a Session. However, you can also add your own keyboard shortcut for any menu item! This feature is actually built in to Mac OS X itself, and it’s incredibly handy. Just open System Preferences (under the Apple menu), then click Keyboard, and go to the Shortcuts tab. From the “App Shortcuts” section, you can add a shortcut for any menu option you like.
For more details on using this powerful OS feature, see this link.
That’s It!
I hope you found something useful to enhance your use of Audio Hijack! If you’ve got your own great tip to share, let us know via email, or with a comment below.
![]() If you’re looking for additional tips, Kirk McElhearn’s Take Control of Audio Hijack eBook is worth your while. It’s just been updated for Audio Hijack version 3.3, and it contains a wealth of information to help you make the most of our software. Just click for more information on Take Control of Audio Hijack.
If you’re looking for additional tips, Kirk McElhearn’s Take Control of Audio Hijack eBook is worth your while. It’s just been updated for Audio Hijack version 3.3, and it contains a wealth of information to help you make the most of our software. Just click for more information on Take Control of Audio Hijack.
Finally, if you’re new to Audio Hijack, you can get $5 off your purchase through the end of June. Just head over to our store and enter coupon code TIPSFIVE before July 1st to save!


