
How to Send Audio From iOS or iTunes to an iOS Device
Posted By Paul Kafasis on June 6th, 2012
As reported elsewhere on this blog, we’ve unfortunately had to remove the ability for Airfoil Speakers Touch to receive audio directly from iOS and iTunes. While this functionality will continue to work for those who previously purchased it, it’s no longer available for purchase. It’s clear, however, that tens of thousands of people wish to send audio from one iOS device to another, or from iTunes to any iOS device. While it’s not as simple as it was before, it is still possible. Herein, we’ll describe two workarounds to make this possible.
Sending From One iOS Device to Another
To send between two iOS devices (iPhones, iPods Touch, and iPads), you’ll now need a Mac or PC running Airfoil to act as an intermediary between the two devices. Here’s how to do it:
Step 1: Send from the first iOS device to your computer
To get started, launch both Airfoil and Airfoil Speakers on the same computer. Next, on your iOS device, tap the AirPlay icon in the audio app you’re using. The Airfoil Speakers instance running on your computer will appear as an output option in the AirPlay sending menu, and you can choose it.
Here, we’re sending from an iPhone to Airfoil Speakers running on a MacBook Air:
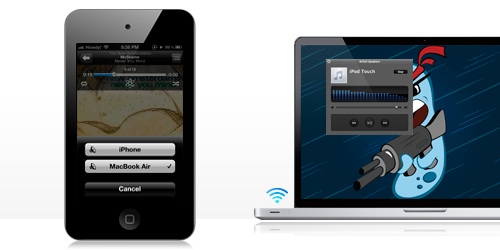
Send from iOS to your computer
And this is Airfoil Speakers running on that MacBook Air, receiving the audio stream from the iPhone:

Airfoil Speakers on the Mac receives audio from the iPhone
Step 2: Send from your computer to the second iOS device
With the audio flowing from the iOS device to our Mac, we’re halfway to sending that audio to our second iOS device. That feat is ultimately accomplished with the help of Airfoil. Open Airfoil and select Airfoil Speakers as your audio source, then transmit the audio out to the desired iOS device.
Below, you can see that the audio originally from the iPhone is being pulled from Airfoil Speakers and sent out to an iPod Touch:

Then, use Airfoil to send from your computer to the second iOS device.
Now, audio from the iPhone is heard on the iPod Touch.
If you’re thinking “Couldn’t I use this to send from iOS to multiple outputs too?”, you’re exactly correct. While iOS’s AirPlay sending allows you to send to just one output, with this workaround, you can send from iOS to multiple outputs. We wrote detailed instructions for this previously.
Sending From iTunes to an iOS Device
Sending from iTunes to an iOS device is a bit more straightforward, as you’re obviously already using a Mac or PC to play audio with iTunes. To get that audio to your iOS device, you’ll use Airfoil to then capture iTunes audio and send it out to Airfoil Speakers Touch.
Step 1: Set iTunes as your source in Airfoil
Launch Airfoil on your computer, and set iTunes as the source as the top of the window, as we’ve done here:

iTunes is set as the source in Airfoil
In iTunes, make sure that your output in the lower right is set to Computer (so Airfoil can capture iTunes’ audio), then play some audio.
Step 2: Capture iTunes’ audio and send it to Airfoil Speakers Touch
On your receiving iOS device, open up Airfoil Speakers Touch. It will then appear in Airfoil as an output option. Click the Transmit button, and Airfoil will capture iTunes’ audio, then send it out. Below, you can see Airfoil sending audio to our iPod Touch.

Airfoil then sends to Airfoil Speakers
Now, the audio from iTunes is being heard on the iPod Touch, thanks to Airfoil. This is, of course, the same process by which any audio on your Mac (from web browsers, from Spotify, and more) can be sent to iOS devices, using Airfoil.
Closing
While it’s unfortunate that we’ve had to remove useful functionality from Airfoil Speakers Touch, it is still possible to route audio to iOS devices. These guides should get you going.


